Macro Photography
Getting Started with
Macro-Photography

Many amateur and seasoned photographers eventually find their way into macro
photography. Because of its presentation, it often looks too difficult to
master. But with a little trial and error, any artist can be a brilliant macro
photographer. Just like shooting sports, wildlife, weddings, and other areas,
it requires a bit of experimentation to get comfortable.


What is Macro-Photography?
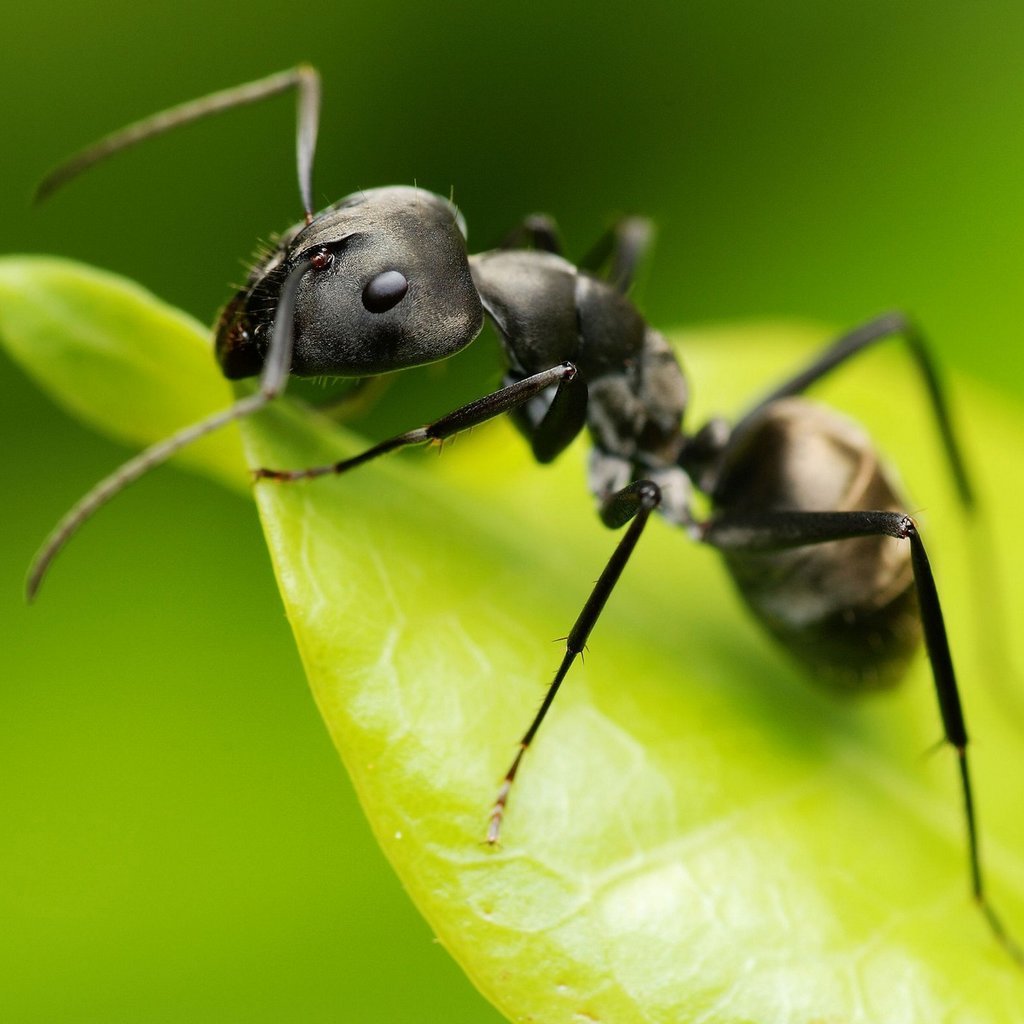
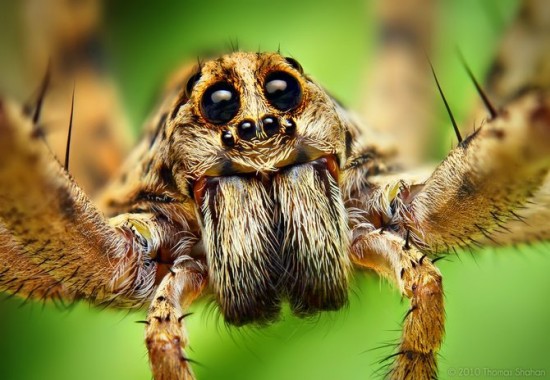
Macro-photography refers to a picture taken on 1:1 ratio or larger, which simply means the image of the subject on the digital sensor or the film is the same size or larger than the real subject. For instance, when a crusader bug covers the whole frame of your shot, or it is a grasshopper’s portrait – that’s macro photography.

Nature shows and stills are the best example of macro-photography. The streak of morning dew running down a flower’s pedestal. The “look” into the eyes of an insect. The still of a rain drop hitting a pond. Anyone with the right equipment can shoot macro-photography. It is an art form in itself. It requires a steady hand, a lot of patient and a bit of intuition.

What Equipment is Needed for Macro-Photography?
Since you are learning how to do best macro photography, it is best to learn on proper equipment. A dedicated 1:1 macro lens is certainly recommended. This lens doesn’t require any additional attachment for obtaining real macro magnification. Macro lenses allow you to get closer to the subject than regular lenses and produce images that are life size or larger.
In case your budget doesn’t allow, the best option would be to purchase extension tubes, which would cost a lot less than a macro-lens. Extension tubes increase the distance from lens to sensor, hence increasing the magnification to approximately 20 to 50 percent, depending on the lens’ focal length.
Diopters or close-up lenses (sometimes also mistakenly called macro-filters) are another and probably the least expensive way to get into macro photography. Diopters mount directly on regular lenses, just like filters, and serve as eyeglasses for your camera.


For obtaining even greater magnification, your best shot would be to use both extension tubes and a macro lens at the same time. However, keep in mind that increased magnification significantly decrease the depth of field (DOF), which means that only a little area of the photograph will be in focus.
Make sure you use the smallest aperture setting and the slower shutter speed. This combination will give you a deeper DOF and the photograph’s subject will be in focus. However, in any case, you need a lot of light, for which you can use a store-bought or homemade solution. One option is to get a special macro double flash mounted on opposite sides of the lens. Another option is to get a ring flash attached right onto the lens. However, those ones are pretty expensive.
While you’re at it, you may want to check out inexpensive ring-flashes which use LED. They are known to cost less. Although, cheap light products do not provide enough light, however, they can suffice for a beginner.

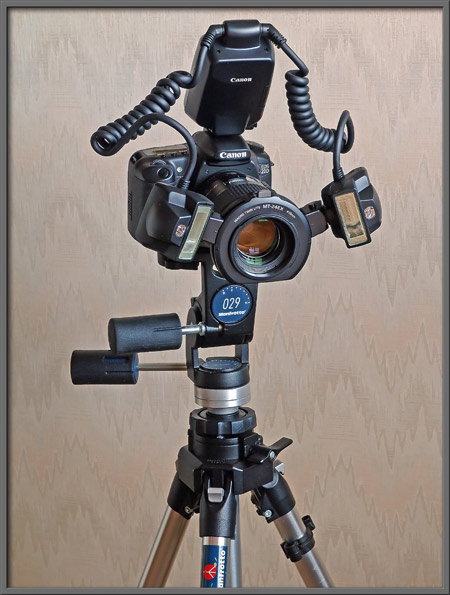
If you already have a regular flash, you can assemble a custom solution by attaching your flash with a homemade light diffuser to a flash bracket, which will bring it closer to the photograph’s subject. Without a light diffuser, your flash will create glares and cast harsh shadows behind your subject.
As it was mentioned above, macro has a shallow DOF, which is why it’s pretty hard to get the focus right, at least at the first try. If you are photographing a still object, it’s a good idea to use a tripod or a monopod. However, if the subject is moving, you better to shoot freehand, since you constantly need to move your camera to focus on the subject. This will require several takes and a lot of patience.
The best part about learning macro photography is that you don’t need to go too far off places or choose any particular situation or timing.
You can just play around in your backyard, take a few shots, upload them to your computer and see the results. You can then keep experimenting on the same objects and see different results.

Above all, don’t stick to the clichéd subjects; instead, unleash your creativity and explore abstract subjects as well as natural. Lastly, enjoy yourself as much as you can! Macro photography can open a miraculous world, which cannot be seen by naked eye. Once you get good at it, you will enjoy it a great deal.
We are often bothered and eluded by the large
things like landscape, river views, lakes etc. but we rarely look to the smallest
things in our world. Macro photography is one of those medium which makes you
feel that even the smallest things have many parts to play in this globe. Macro
photography means that image on the film plane is nearly equal to the size of
the object. The lenses designed for macro photography are very sharp at macro
focal length. Recently, the term Macro Photography is used at market level to
state that: being able to focus on an object close enough, so that when a print
is made the image is almost of the same size as the object itself.
Equipment Needed-What Kind of
Camera
Opting for Point and shoot cameras will be a good
choice indeed. These cameras have great ability to deliver a good image, but
for a better result it is wise to shift for single-lens reflex cameras. These
allow you to attach special Macro Lenses which further gives you the
opportunity to see what you have on the digital Sensor.


Few things to follow
1-If you attach a telephoto extender between your
camera body and lens A 1.4x or 2x , it converter, it gives you a far better and
large image along with macro capabilities. Due to this extender a long time is
need for the exposure and to reach the light on the digital sensor.
2-Macro lenses are those lenses which are specially designed for this purpose, sometimes it is also regarded as micro lens by the manufacturer. The later term is specifically more accurate than the former, but alas! We called it Macro more often. This lens provide you with consistent high optical quality while taking the macro shots , since they continuously change the formulae each time you do more focus .
There are different kinds of Macro lens
- i) 50-60 mm range- used for taking products photographs
- ii) 90-105mm range- used for normal insects , tress, plants and small objects
- iii) 150-200 range gives you high power- typically used for insects, birds, plants
Technical Consideration
Depth
of Field
There is a primary requirement for the field is: it
should be of lower depth, as it turns out to be essential to focus critically
and systematically on the most important part of the subjects. Small sensor
bridge cameras and compact digital cameras have an coincidental advantage on
macro photography due their inherently deeper depth of field. It has been
observed that with the decrement of actual focal length of the lens the depth
fades and so these compact digital cameras can easily get to the magnification
of a 420 mm lens along with greater depth of field.


Lightning
It is really a common problem faced by many
photographers during their projects or work. There are some lenses which touch
the object while focusing, now it is really difficult to place a light source
between the object and camera and so making it impractical for maximum close-up
photography. Even a normal lens (50mm on a 35mm camera) can focus on an object
to such an extent that lightning remains difficult . So to overcome this
incredible Telephoto macro Lenses come to aid for the photographers. This lens
has a focal length of 100 to 200 mm and permits sufficient distance for the
light to reach the object.


Super Macro Photography
"Up Close with Greater Depth"
Macro photography (and close-up photography) can be made difficult because of the small depth of field (DOF) inherent in high magnification techniques. Whist blurred out of focus areas can enhance a picture designed for creative effect, many close-up and macro photography techniques are used to show the greatest detail, and this calls for as high a degree of sharpness as possible.

Flower photography is a typical example of exacting close-up and macro range imaging, in which depth of field has great importance in showing different parts of flower anatomy in optimum resolution. The technique outlined below can be applied to any close-up photography where there are problems in obtaining deep focus.
Many flowers of around 24 mm across will comfortably fill the frame of a digital single lens reflex sensor at 1:1 ratio. At this magnification there will be a very limited depth of field. Depending on the actual lens used, at f8 this can be as small as 0.6mm. By closing down the aperture there will be more in focus. A dedicated close up lens can well be closed down to f 32 when a DOF of about 2.3mm can be expected.


This closing of the aperture would appear at first sight to be the solution, but at smaller apertures the whole picture begins to lose sharpness because of a phenomenon known as diffraction. This is the inability of a very small lens aperture to produce a well defined image due to light bending and spreading out at narrow diaphragm openings. Added to this, a small aperture opening means a longer exposure time, with all the problems inherent in producing a very accurate image, with no trace of movement (particularly noticeable in macro photography). In flower photography splayed out stamens and other flower parts can easily exceed 5 mm and therefore parts of the flower will often be out of focus at any aperture setting.

In practice nearly all photographic lenses will work best in the middle range of their aperture rating, f8 or at the most f11 will give optimum results.
Extremely beautiful picture! Roses are my favorite
flower, and this one is particularly great. I love the droplets of water, they
really add a nice contrast to the flower. The green and red colors are also
great, and I love how the droplets are green instead of clear. Red and green
colors also put me in the mood for Christmas. The center of the flower is
wonderful, and I love how in changed colors. Also, the shadows under the petals
add a nice touch to the overall photo. Despite it’s beauty, it’s definitely not
the most original piece out there. Overall, it’s a really excellent piece.
Macro Photography tips
The most important thing to remember when taking
Macro Photography, is that you need to be patient. Lots of patience is required
to get the correct snap with good exposure and focus. I guess that i have
included most of the best Macro photographs available.
Thanks .. Hope this will helpful for you !
...